Monday 12 November 2012


While modeling the P2, I felt a great lack of properly replicated material appearances in the default Inventor library. So, I thought that I should make my own library, with most used material appearances and share it with you.

Most of the appearances there will have just a single colour for a type, but you can easily change the colour to suit your needs (I.e. instead of black paint, you can modify it to be white paint! Shocking, huh?). Most of the material appearances should work that way.

Adding the library to Inventor '13:

Download the library from my portfolio site: www.petrikas.net/d/PetrikasLibrary.zip; Extract it and put the *.adsklib file somewhere safe.
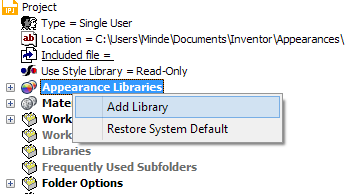
Import the library: open your Projects windows, right click Material Appearances and select Add library; browse and select the Petrikas Library.adsklib file.


More info about each appearance can be found in the Appearance editor, Information tab.

Please note that these appearances were made to work with Realistic view with Ray Tracing, not Inventor Studio, as it is a better way to portray a material.

Most of the materials in the the library were used on the Petrikas P2 car. I made a couple of new renders with the materials applied and added to my portfolio.

Leave a comment saying thanks, or how crappy my appearances are in the comment box below.

Material appearances included in the library


Wednesday 7 November 2012

I. The Update:

Chop chop chop! Done some work using a hacksaw, a hammer and some nails.

II. The Changelog:
  • Trimmed the body panels a bit. I was always afraid of poor aerodynamic performance in the area around the radiator. It seemed that the air that entered had nowhere to go. So, I came up with an idea of chopping a bit of the side panel to let the air flow out properly. This modification also reduces the work I'll need to do, when I'll be actually cutting the panel. 
  • Finally, I added brackets for the nosecone! Yeah, I know. This should've been done a while a go. 
III. The Images:

Modifications to the front. (Licence plate holder temporary removed)

Saturday 3 November 2012

I made another alteration of the P2. The P2GT - the Grand Tourer. It's basically the same as the P2, just with a roof, some doors, a windshield and a spare wheel. Took me some time to model it though.

So, I present you the whole line of Petrikas cars: The P2; The P2R and the P2GT.
(I am still planing on building only the P2. The rest are too complicated, I don't think that I'll ever have the time or the money OR the knowledge to build the other two. Yeah, I know, it's sad. Meh, I'll leave it for the future generations)

Petrikas P2. Soon in production.
Petrikas P2R
Petrikas P2GT

Friday 19 October 2012

I. The Update:

Fear not people - the project is still active. The amount of updates has been reduced, but it's still alive. I'm happy that I can still work on the project, as I have some spare time between browsing through the job ads. "P2" is the only thing that keeps me sane, to be honest. Hopefully things will move on and I'll be able to start building the car itself soon.

II. The Changelog:

  • Properly re-assembled frame. I know now the workflow I will use to weld it, which will help me to build the frame quickly and easily. The tubes are numbered and coded, so no wandering around the garage and thinking which tube goes where and what angle it has to be cut. Everything is there in the assembly now. 
  • The tubes now have appropriate radii on the edges. 
  • Shifter mechanism was changed in order to be placed under the tubes (see image below)
  • Handbrake with trim added.
  • Dashboard is now fully completed, with explanatory icons on it.
  • Re-engineered pedalbox. (The old one from Haynes Roadster manual didn't quite fit there)
  • Incoming wind deflector behind the radiator added. Don't want to have cold feet.
  • Modified the front and rear shock brackets for strength
  • Hood catches added. Finally.
III. The Images:

Frame Assembly
Interior
"Clay Render" 1. Weird red glitch included.
"Clay Render" 2. Weird gap between the hood and the frame included.
Just the car from the front. This is the first time I display it from this angle!

Sunday 16 September 2012

I. The Update:

Finally, after a long break I got to play around with P2 again. I've been "tidying" it up from time to time, but never got round to modeling the actual dashboard. Until yesterday. Therefore, I present you the most simple car dashboard ever.

II. The Changelog:

  • 4-position headlight switch.
  • On-Off switch with "doomsday" cover (battery kill-switch). The cover is necessary for the switch to meet the IVA requirements. Looks cool as well!
  • Engine start button.
  • Ignition switch with a key with a "Petrikas" keychain.
  • Hazard pull-switch
  • Koso all-in-one digital instrument
III. The Images:

These are the items I tried to replicate
And this is the result


Wednesday 12 September 2012

Well, my portfolio website is up and running.
Give it a good look and tell me what you think: www.petrikas.net

More projects will be added as I go, but the worst part is already over - putting it up there.
Enough with this html5 thing. Now - I shall go back to modelling and CAD things!

Saturday 25 August 2012

Hello all,

As You have probably noticed, the blog is no longer called "Petrikas P2". From now on it's Petrikas.
As I have mostly finished modelling the P2, I can't find anything interesting to post about it, at least until the actual build starts.

At this point I decided to test my skills in Industrial design. Therefore I am trying to design and model various product (ideas) concepts to feel the joy of accomplishment once again. Hopefully, those products will help to form my portfolio as well.

Meanwhile, here's the current state of the car and some of my recent 'sketches' that I made with Inventor:

P2 in parts. Over 800 parts including some nuts and bolts.
P2 as it is at the moment
P2R, made just for fun, not planed for production, unfortunately.
The chair
The watch

The phone